What Is the 3:1 Rule in Audio Recording?

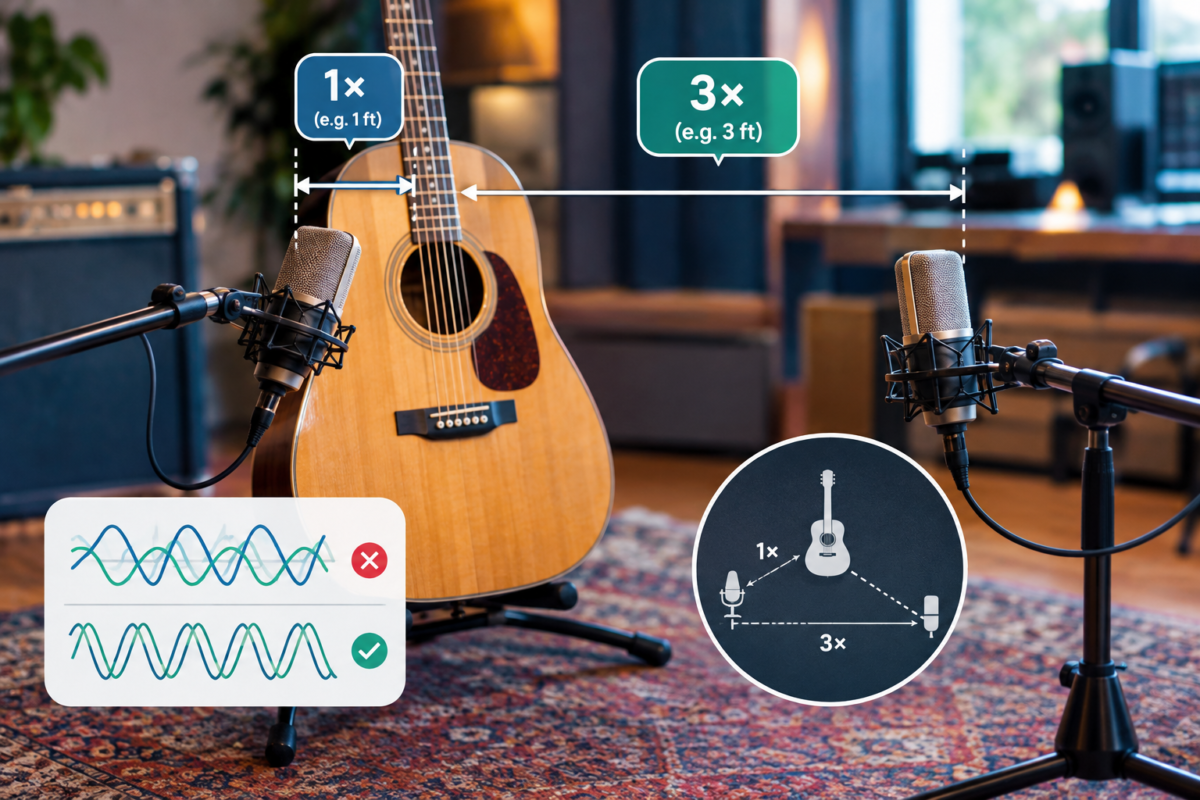
The 3:1 rule in audio recording is a simple microphone-placement guideline used to reduce phase problems when recording with more than one microphone. In basic terms, the distance between two microphones should be at least three times the distance between the first microphone and its sound source.

For example, if you place a microphone 1 foot away from a guitar amp, the second microphone should be at least 3 feet away from the first microphone. This helps prevent a thin, hollow, or “phasey” sound caused by the same audio arriving at each microphone at slightly different times.

The rule is especially useful when recording instruments with multiple mics, such as acoustic guitars, drum kits, choirs, piano, and live sound setups. It is not a strict law of audio engineering, but it is a dependable starting point for cleaner recordings.


Why the 3:1 Rule Matters

When sound travels through the air, it moves in waves. If two microphones pick up the same sound from different distances, the sound may reach one microphone slightly earlier than the other.

That small time difference can cause phase cancellation. In simple language, the waves may line up in a way that weakens certain frequencies. The result can be a recording that sounds hollow, distant, weak, or unnatural. This effect is often called comb filtering because of the comb-like pattern it creates in the frequency response.

The 3:1 rule helps because it creates enough distance between microphones. When one microphone is much closer to the sound source, it captures that source at a stronger level. The farther microphone picks up less of that same sound, so any phase interaction becomes less noticeable.

Think of it like two people trying to have a conversation in a noisy room. If they stand close together, their voices are clear. If one person is far away, their voice becomes much quieter and has less influence on the conversation. The same idea applies to microphones and unwanted sound bleed.


How to Use the 3:1 Rule

Using the 3:1 rule is easy once you understand the basic measurement.

  1. Measure or estimate the distance from the first microphone to its sound source.
  2. Multiply that distance by three.
  3. Place the second microphone at least that far away from the first microphone.

For instance:

  • If Mic A is 6 inches from an acoustic guitar, Mic B should be at least 18 inches away from Mic A.
  • If Mic A is 1 foot from a singer, Mic B should be at least 3 feet away from Mic A.
  • If Mic A is 2 feet from a drum, Mic B should be at least 6 feet away from Mic A.

The key measurement is the distance from the first microphone to the source, not simply the distance between the two microphones. The second microphone should be at least three times that first distance away from the first mic.

This rule can also apply when using several microphones. If your first microphone is 1 foot from the source, the second microphone should be at least 3 feet away. If you add a third microphone, it should be placed even farther away, often at least 9 feet from the original source, depending on the setup.


Example: Recording an Acoustic Guitar

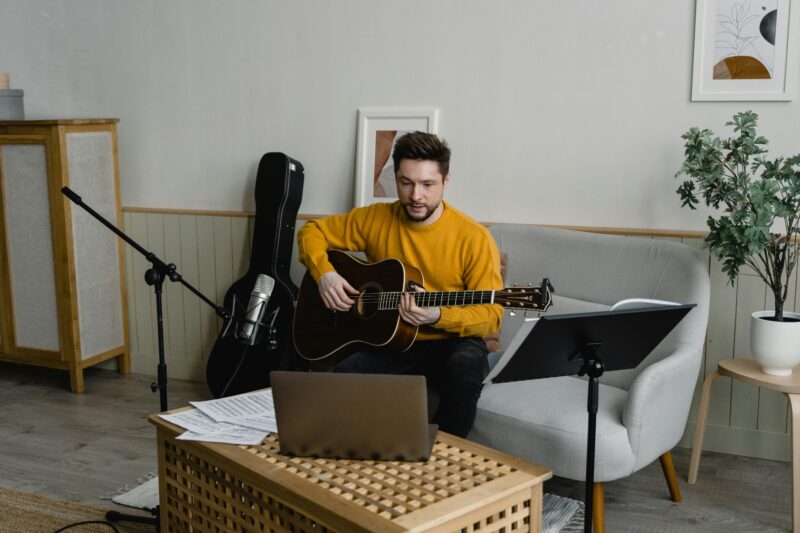
Imagine you want to record an acoustic guitar with two microphones: one near the sound hole and another near the fretboard.

If the first microphone is placed 8 inches from the guitar, the second microphone should be at least 24 inches away from the first microphone. That gives the sound enough separation to reduce phase cancellation.

Without enough spacing, the two microphones may capture the guitar’s sound at slightly different times. When you listen to both tracks together, some frequencies may disappear or sound uneven. The recording may lack body, warmth, or clarity.

By following the 3:1 rule, you give each microphone a clearer job. One microphone can focus on the body and low-end warmth of the guitar, while the other can capture more string detail and finger movement.


When to Use the 3:1 Rule

The 3:1 rule is most helpful when you are using multiple microphones to record the same sound source or nearby sound sources.

Common situations include:

  • Recording an acoustic guitar with two microphones
  • Miking a drum kit with several close microphones
  • Recording a piano with multiple microphones
  • Recording a choir, ensemble, or group of singers
  • Capturing a live band with several vocal and instrument microphones
  • Recording a podcast or panel discussion with multiple people using separate microphones
  • Setting up microphones for live sound reinforcement

In live sound, the rule is especially important because multiple open microphones can pick up the same voices or instruments. If the microphones are too close together, the sound system may produce phase issues, feedback risks, and a less clear mix.


When the Rule May Not Apply

The 3:1 rule is a helpful guideline, but it is not something you must follow in every recording situation.

Sometimes, engineers intentionally place microphones close together. A common example is a stereo pair, such as an XY pair or spaced pair. These setups are designed to capture a wider stereo image, and they may not follow the traditional 3:1 spacing.

Other times, the room, instrument, microphone type, and desired sound matter more than the rule itself. A close-miked electric guitar cabinet, for example, may sound great with one microphone, while adding a second microphone requires careful placement and phase checking.

The 3:1 rule is best treated as a starting point, not a rigid formula. If the recording sounds full, clear, and natural, you do not need to force the exact measurement. If it sounds thin or hollow, adjust the microphone distance and listen again.


Phase Cancellation Explained Simply

Phase cancellation happens when two versions of the same sound combine in a way that reduces part of the audio.

Sound waves have peaks and valleys. When two identical waves line up, they reinforce each other and become louder. But when one wave’s peak meets another wave’s valley, they can partially cancel each other out.

In a recording, this can make certain frequencies weaker. You may notice:

  • A hollow or “underwater” sound
  • Reduced bass or low-end warmth
  • A thin vocal or instrument tone
  • A strange change in sound when two tracks are played together
  • A recording that sounds better when one microphone is muted

This does not mean phase cancellation is always bad. In stereo recording, small phase differences can create width and space. But when you want a clear, focused, mono-compatible sound, controlling phase becomes important.


How to Check for Phase Problems

The easiest way to check for phase issues is to listen carefully.

Record both microphones, then play the tracks together. Next, mute one microphone and listen again. If the combined sound suddenly becomes thinner, weaker, or hollow, you may have a phase problem.

You can also try these quick checks:

  • Flip the polarity or phase button on one microphone channel and compare the sound.
  • Move one microphone slightly closer or farther from the source.
  • Change the angle of one microphone.
  • Use fewer microphones if the extra mic is not adding much value.
  • Record each microphone on a separate track so you can adjust them later.

Trust your ears more than any rule. The 3:1 rule can prevent many issues, but testing the actual recording is always the best final check.


Tips for Better Microphone Placement

Here are a few practical tips to make the 3:1 rule work well in your recordings:

  • Start with one microphone and get the best sound possible before adding another.
  • Keep the primary microphone close to the sound source.
  • Place additional microphones far enough away to reduce unwanted bleed.
  • Use directional microphones, such as cardioid mics, to help reject sound from unwanted directions.
  • Avoid placing two microphones at equal distances from the same source unless you intentionally want a specific stereo effect.
  • Listen in mono as well as stereo to check for phase cancellation.
  • Make small adjustments instead of moving microphones dramatically.
  • Label your tracks clearly so you know which microphone captured which part of the sound.

Good microphone placement is often about balance. You want enough microphones to capture the detail you need, but not so many that they create confusion, bleed, and phase issues.


Common Mistakes to Avoid

One common mistake is placing two microphones very close together while both are picking up the same instrument. This can create strong phase interaction, especially if the microphones are at different angles or distances from the source.

Another mistake is assuming that expensive microphones will automatically fix phase problems. Even high-quality microphones can create issues if they are placed poorly.

Also, avoid relying only on visual placement. Two microphones may look properly spaced, but the sound can still interact in unwanted ways. Always record a short test and listen back before starting the full session.

Finally, do not treat the 3:1 rule as a replacement for good monitoring. Your ears, the room, the instrument, and the style of music all affect the final result.


The 3:1 rule

The 3:1 rule in audio recording is a practical way to reduce phase cancellation and create cleaner multi-microphone recordings. It says that the distance between two microphones should be at least three times the distance from the first microphone to its sound source.

Use it as a helpful starting point when recording guitars, drums, vocals, ensembles, podcasts, or live sound. Then listen carefully, test your setup, and make adjustments based on what sounds best.

When used well, the 3:1 rule helps your recordings sound fuller, clearer, and more professional—without turning microphone placement into a complicated science experiment.
Step-by-Step Guide On How to Properly Record a Song

Recording a song at home used to feel like a dream reserved for pros with big budgets. Today, you can capture radio-ready tracks from your bedroom—if you know the right steps. This guide walks you through exactly how to properly record a song, from setting up your space to nailing your takes, editing, and prepping for mixdown. No fluff, no jargon—just clear, helpful advice that gets results.


What You’ll Need Before You Hit Record

You don’t need a million-dollar studio, but you do need a few essentials to get clean, usable audio.

  • Microphone: A condenser mic is great for quiet, controlled rooms. A dynamic mic works better in untreated or noisy spaces.
  • Audio interface: This connects your mic to your computer and provides clean preamps.
  • DAW (Digital Audio Workstation): Software like Ableton, Logic, FL Studio, or Reaper where you record and edit.
  • Headphones: Closed-back headphones help you hear the track without bleed into the mic.
  • Pop filter: Reduces harsh “p” and “b” sounds (plosives).
  • Mic stand and XLR cable: For stable placement and connection.
  • Quiet, soft room: Choose a small room with curtains, rugs, or blankets to reduce echo.

Optional but helpful: acoustic panels or bass traps for corners, a reflection filter behind the mic, and a thick rug if you have hard floors.


Step 1: Set Up Your Recording Space

Your room is your first instrument. Even the best mic will sound thin or boxy in a bad space.

  • Pick the quietest room: Close windows, turn off fans/AC, and record when your home is calm.
  • Reduce reflections: Hang heavy blankets on walls behind and beside the mic. Add a rug if you have tile or hardwood.
  • Avoid the center: Don’t record in the middle of an empty room. Stand closer to a wall or corner with soft materials.
  • Point the mic away from hard surfaces: Aim the mic toward soft furnishings, not bare walls or windows.

If you’re on a tight budget, two mattresses in a corner with the mic in front and one behind you can work surprisingly well.


Step 2: Connect and Configure Your Gear

Get your signal path right so you record clean audio without noise or clipping.

  • Mic → XLR cable → audio interface → computer: This is the standard chain.
  • Set your DAW track: Create a new audio track, select the correct input (your interface’s mic channel), and arm the track for recording.
  • Sample rate and bit depth: Record at 24-bit resolution for more dynamic range. 44.1 kHz or 48 kHz sample rate is standard.
  • Monitor with headphones: Use closed-back headphones to avoid bleed into the mic.

Step 3: Mic Placement and Pop Filter Setup

Good placement saves hours of fixing problems later.

  • Distance: Stand 6–8 inches (15–20 cm) from the mic capsule. For louder singers, go 8–10 inches.
  • Height: Keep the mic at mouth level, slightly tilted upward.
  • Angle: Point the mic slightly off-axis (15–30 degrees toward your nose or chin) to reduce sibilance and plosives.
  • Pop filter: Mount it 2–4 inches in front of the mic, and keep your mouth 4–8 inches behind the filter.
  • Mark your spot: Put tape on the floor for your feet and on the mic stand for height so you stay consistent across takes.

Step 4: Set Your Gain (Levels) the Right Way

Gain staging is the difference between a clean recording and a distorted mess.

  • Ask the singer to perform the loudest part (usually the chorus) at full intensity.
  • Watch your DAW input meter: Aim for peaks between -18 and -12 dBFS. Some guides say -12 to -6 dBFS is fine, but never hit 0 dBFS (clipping).
  • Adjust the interface gain knob: If peaks go above -12 dBFS, lower the gain. If they’re below -24 dBFS, raise it.
  • Leave headroom: Recording “hot” (too loud) leaves no room for plugins later. Louder is not better.

Step 5: Warm Up and Test

Don’t jump straight into the final take.

  • Vocal warm-up: 5–10 minutes of scales, humming, or lip trills.
  • Hydrate: Drink room-temperature water (not ice cold).
  • Test recording: Record 30 seconds to check levels, tone, and room noise.
  • Record silence: Capture 3–5 seconds of room tone before your first take. This helps with noise reduction later.

Step 6: Record Multiple Takes

One take is rarely the best take.

  • Record at least 3 full takes of each section (verse, chorus, bridge). More is better if you have time.
  • Stay consistent: Keep the same distance, posture, and mic position for every take.
  • Use a click track or instrumental: Make sure the tempo and key match your arrangement.
  • Punch in if needed: If you mess up a line, re-record just that part instead of the whole song.

Step 7: Comping (Choosing the Best Parts)

Comping means combining the best phrases from multiple takes into one master vocal track.

  • Listen to all takes: Mark the best lines, words, or even syllables.
  • Create a new track: Copy the best sections onto one clean vocal track.
  • Smooth transitions: Add tiny crossfades (10–30 ms) between comped sections to avoid clicks.
  • Keep it natural: Don’t over-edit. The goal is a cohesive performance, not a robotic one.

Step 8: Basic Editing and Cleanup

Before mixing, tidy up your audio.

  • Trim silence: Cut long gaps before and after phrases, but leave a little breath for realism.
  • Remove clicks and pops: Use your DAW’s fade tools or a dedicated de-click plugin.
  • Tune only where needed: Apply light pitch correction (like Auto-Tune or Melodyne) only on off notes.
  • De-noise if necessary: Use a noise reduction plugin on the room tone you recorded earlier to create a profile, then apply lightly to the vocal.

Step 9: Pre-Mix Prep (Optional but Smart)

You don’t need to mix yet, but a little prep makes the next stage easier.

  • Organize tracks: Label your vocal, instrumental, and FX tracks clearly.
  • Group similar tracks: Group all background vocals or all drums for easier processing later.
  • Save versions: Keep a “raw” version of your song before adding any effects, so you can always go back.
  • Check phase: If you used multiple mics, make sure they’re not canceling each other out.

Step 10: Export for Mixing or Mastering

When your recording and editing are done, export a clean version for the next stage.

  • Export as WAV: Use 24-bit WAV for the highest quality. Avoid MP3 for mixing.
  • Leave headroom: Make sure your final export peaks around -6 dBFS to give the mixing engineer room to work.
  • Include all tracks: If you’re sending to a pro, export each track (stems) as well as the full mix.

Common Mistakes to Avoid

Even small errors can ruin an otherwise great recording. Watch out for these:

  • Recording in a noisy or echoey room: Kitchens, bathrooms, and empty living rooms sound terrible.
  • Mic too close or too far: Too close = boomy and plosive-heavy. Too far = thin and roomy. Stick to 6–10 inches.
  • Clipping the input: If your meter hits 0 dBFS, the audio is distorted and unusable.
  • Using compression or heavy effects while recording: Record dry (no effects) so you have flexibility later.
  • Only one take: You limit your options for comping and fixing mistakes.
  • Ignoring gain staging: Recording too hot or too quiet makes mixing harder and can introduce noise.

Quick Checklist Before You Record

Run through this list every session to save time and stress:

  • Room is quiet and soft (blankets, rugs, curtains in place)
  • Mic is 6–8 inches from mouth, slightly off-axis
  • Pop filter is 2–4 inches in front of the mic
  • Gain is set so peaks hit -18 to -12 dB
  • Headphones are on, track is armed, and input is selected
  • 3–5 seconds of silence recorded for noise profile
  • At least 3 full takes recorded for each section
  • Best parts comped onto one vocal track
  • Clicks, pops, and obvious pitch issues fixed
  • Exported as 24-bit WAV with headroom

Keep It Simple and Consistent

Recording a song properly isn’t about fancy gear—it’s about good habits. Choose a quiet room, place your mic right, set your gain conservatively, and record multiple takes. Edit lightly, comp thoughtfully, and export cleanly. Do these steps consistently, and your home recordings will sound polished, professional, and ready for the next stage.

Now you’ve got the blueprint. Set up your space, hit record, and let your song shine.

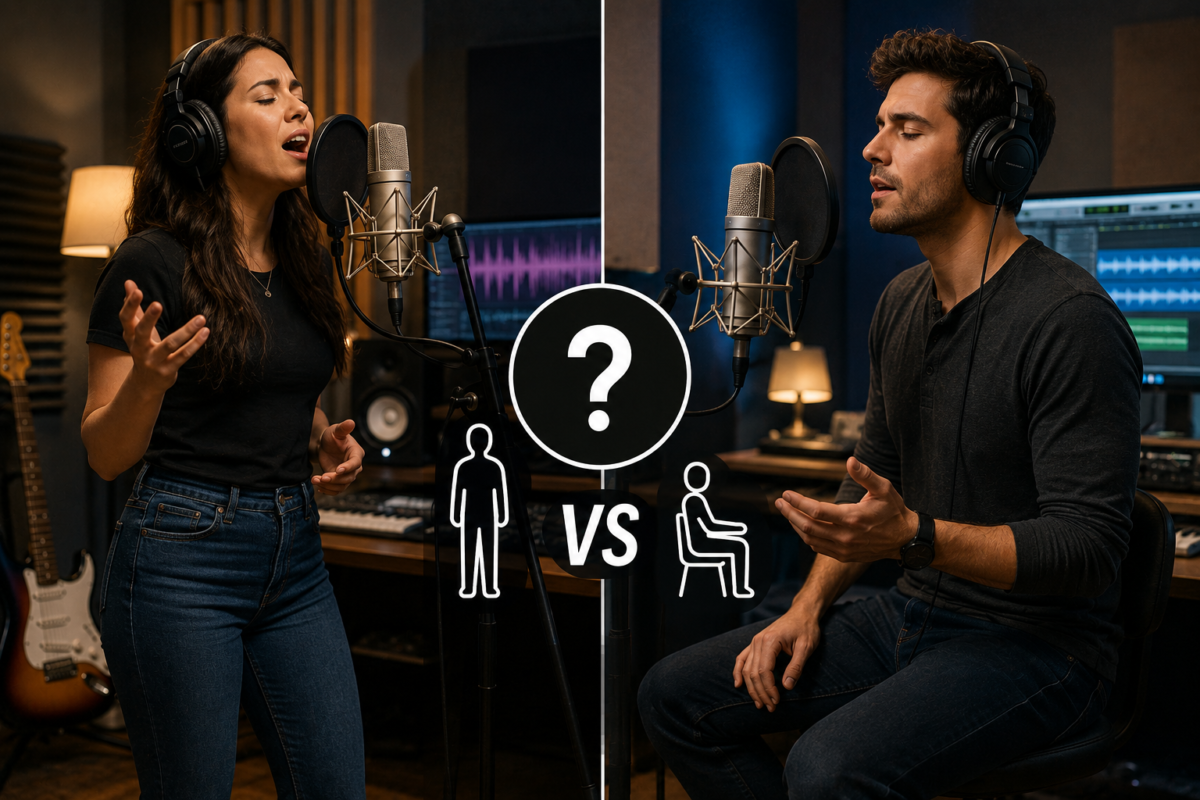
Is It Better to Stand or Sit When Recording Vocals?

When recording vocals, standing is generally the better choice for most singers. It can make it easier to breathe deeply, maintain good posture, project your voice, and deliver a more energetic performance.

However, sitting is not automatically wrong. The best position is the one that allows you to sing comfortably, breathe naturally, stay consistent near the microphone, and give your strongest performance. If sitting helps you relax and produce a better take, it may be the right choice for you.

The decision is not simply about whether standing or sitting is “correct.” It depends on your vocal style, song, physical comfort, recording setup, and ability to maintain proper posture.


Why Many Singers Prefer Standing

Standing gives your body more freedom to move. Your ribs, abdomen, chest, neck, and shoulders can expand naturally as you breathe. This can be especially helpful when singing long phrases, powerful choruses, high notes, or emotionally intense sections.

When you stand correctly, your body is naturally arranged in a way that supports vocal performance. Your feet can stay grounded, your spine can remain tall, and your shoulders can stay relaxed. This creates a stable foundation without making your body feel stiff.

Standing may also help you feel more connected to the song. You can use natural hand gestures, move slightly with the rhythm, and bring more physical energy into your delivery. That extra movement can make a major difference when recording pop, rock, R&B, gospel, musical theater, or other expressive styles.

Good standing posture can also help prevent unnecessary tension. When the head, neck, shoulders, and spine are aligned, you are less likely to push your chin forward, collapse your chest, or tighten your throat while singing.

That said, standing does not automatically improve every vocal recording. If you lock your knees, raise your shoulders, lean too far forward, or sway constantly, standing may create new problems. The goal is not to stand like a statue. The goal is to remain balanced, relaxed, and ready to breathe.


How Standing Can Support Breathing

Breath control is one of the main reasons singers choose to stand while recording. Singing requires controlled airflow, and your posture affects how freely your body can manage that air.

A useful standing position includes:

  • Feet about hip-width apart.
  • Knees relaxed rather than locked.
  • Hips balanced under the ribs.
  • Chest comfortably lifted without being forced upward.
  • Shoulders relaxed.
  • Head balanced over the neck.
  • Jaw and tongue free from unnecessary tension.

Your body should feel tall, but not rigid. Imagine that the top of your head is gently lifting upward while your feet remain connected to the floor.

This position gives your rib cage and abdomen room to respond as you inhale and sing. You should not force your stomach outward or try to take an enormous breath before every line. Instead, allow the breath to enter quietly and let your body manage the airflow gradually.

Standing can be particularly useful for vocal parts that require:

  • Long phrases.
  • Strong volume.
  • Sustained notes.
  • Fast lyrics.
  • Belting.
  • Vocal runs.
  • Dramatic emotional changes.
  • Frequent movement between chest voice and head voice.

A recent study examining sitting and standing during voice-range-profile performance found no significant difference in the measured vocal parameters between the two positions for healthy, untrained participants. This suggests that standing is not a magic solution; posture quality and the individual singer’s response matter more than the position alone.

In other words, standing may provide better physical freedom, but it will not automatically make your voice better. A comfortable singer with good alignment can often perform well in either position.


Is Sitting Bad for Recording Vocals?

No. Sitting is not bad for recording vocals as long as you sit in a way that supports your voice.

The problem is usually not the chair itself. The problem is slouching.

When singers sink into a chair, their chest may collapse, their shoulders may round forward, and their abdomen may become compressed. This can make breathing feel restricted and may encourage tension in the neck or throat. Slouching can also change the distance between your mouth and the microphone, creating unwanted changes in volume and tone.

Sitting can work well when you:

  • Keep both feet flat on the floor.
  • Sit toward the front or middle of the chair rather than sinking into the back.
  • Keep your spine long.
  • Let your shoulders rest naturally.
  • Keep your head level.
  • Avoid crossing your legs.
  • Leave enough space for your abdomen and ribs to move.
  • Keep your body facing the microphone.

A firm chair without bulky armrests is often more practical than a soft couch. A couch may feel comfortable, but it can encourage you to sink into an uneven position. An adjustable stool can also be useful because it allows you to sit tall while keeping your feet supported.

Sitting may be the better option when you are recovering from an injury, recording for a long period, dealing with fatigue, or performing a softer and more intimate vocal. Some singers feel more relaxed when seated, and relaxation can improve pitch, tone, and emotional delivery.

Sitting can also be useful during songwriting sessions, vocal editing, or repeated takes. If you need to operate your recording software between takes, a seated setup may be easier and more efficient.

The key is to make sure your seated position does not reduce your breathing space or cause you to collapse toward the microphone.


Standing Versus Sitting for Different Vocal Styles

The best position may change depending on the type of vocal you are recording.

Pop and Rock Vocals

Standing is often helpful for pop and rock vocals because these styles may require energy, strong projection, and physical expression. Standing can make it easier to use your entire body and deliver a powerful chorus.

If you are recording a softer verse followed by a large chorus, you can still stand for both sections. Instead of changing positions, adjust your energy, breath pressure, facial expression, and distance from the microphone.

Ballads and Intimate Vocals

Sitting may work well for quiet ballads, acoustic songs, and intimate performances. A seated position can help some singers feel calm and focused, especially when the performance depends on subtle emotion rather than physical power.

However, sitting should not mean becoming inactive. Keep your feet grounded, maintain a tall spine, and allow your ribs to expand. A relaxed seated performance can sound warm and close without becoming breathy or weak.

Rap and Spoken Vocals

Rappers and spoken-word performers may use either position depending on their delivery. Standing can help with fast flows, aggressive projection, and high-energy performances. Sitting may be convenient for long sessions or more conversational styles.

The most important factors are rhythmic control, consistent microphone distance, clear articulation, and enough breath to complete each phrase. If sitting causes you to lean toward the microphone during intense lines, standing may be more reliable.

High Notes and Belting

Standing may give you more room to manage high notes and powerful phrases, but it does not guarantee easier singing. High notes should not be forced by pushing the body forward or raising the shoulders.

Whether sitting or standing, keep your neck relaxed and avoid lifting your chin to reach the note. A balanced posture helps you maintain a more consistent vocal tract shape.

Harmonies and Background Vocals

Sitting can be practical when recording many harmony parts. You may spend a long time repeating short sections, checking pitch, and moving between tracks. If sitting helps you remain focused and comfortable, it can be a smart choice.

Just remember that harmonies still need proper breath support and consistent mic technique. A tired, slouched posture can affect tone even when the vocal part seems easy.


Microphone Position Matters More Than You Think

Your posture and microphone technique work together. You can have excellent body alignment, but the recording may still sound inconsistent if you move too close or too far away from the microphone.

Set the microphone at a height that allows you to keep your head level. If it is too low, you may bend your neck or look downward. If it is too high, you may lift your chin or strain to reach it. A properly positioned microphone encourages a natural posture.

Use a pop filter between your mouth and the microphone. A practical starting point is to place your mouth several inches from the pop filter, then adjust the distance based on your microphone, room, voice, and desired sound.

Try to keep a consistent distance during normal singing. If you move forward for quiet lines and slightly backward for louder sections, do it smoothly and repeatably. Sudden movements can create large volume changes, tonal differences, or proximity-effect buildup.

A producer may ask you to move closer for a softer, more intimate sound or step back slightly for a loud section. This can work well, but it should be controlled rather than random.

The microphone should also be positioned so you do not need to twist your body, bend your neck, or lean sideways. Face the microphone naturally and keep your mouth directed toward the capsule.


Why Consistency Is Important

The best vocal position is the one you can repeat from take to take.

Imagine recording a verse while sitting, a pre-chorus while standing, and the chorus while leaning toward the microphone. Even if every section sounds good by itself, the tone and volume may change noticeably when the parts are combined.

Consistency helps your vocals sound more natural during editing and mixing. It also makes it easier for the engineer to compare takes, comp the best phrases, and apply compression or equalization without correcting large performance differences.

Before recording, choose a position and test it with a short section of the song. Listen for:

  • Vocal tone.
  • Breath comfort.
  • Pitch stability.
  • Energy.
  • Mic distance.
  • Jaw and neck tension.
  • Volume consistency.
  • Ease of repeating the performance.

Record the same line while sitting and standing if you are unsure. Do not judge only by how the position feels. Listen back to both recordings and ask which one sounds more controlled, expressive, and natural.

Sometimes a singer feels more powerful while standing, but the recording sounds tense. Another singer may feel relaxed while sitting, and the final vocal may sound better. Your ears should help make the final decision.


Common Problems When Standing

Standing is useful, but poor standing posture can hurt your recording.

Locking Your Knees

Some singers lock their knees because they are trying to stand perfectly still. This can make the body feel rigid and may increase tension. Keep your knees soft and allow your weight to remain balanced.

Leaning Into the Microphone

Leaning forward can compress your body and change the sound as you get closer to the microphone. Stand or sit tall enough that the microphone comes to you rather than forcing your body toward it.

Raising the Shoulders

When singers take a breath, they sometimes lift their shoulders. This often creates visible tension and makes breathing feel less natural. Let the shoulders remain quiet while the ribs and abdomen respond to the breath.

Swaying Too Much

Movement can add emotion, but excessive swaying may change microphone distance and create uneven recordings. Use small, natural movements and return to a reliable center position.

Standing Without Grounding

If your feet shift constantly, your performance may feel unstable. Place your feet comfortably apart and let your weight distribute evenly. You can still move, but begin from a stable base.


Common Problems When Sitting

Sitting can also create posture issues that affect the voice.

Slouching

Slouching is the biggest concern. It can reduce the space available for breathing and make the tone sound less open. Sit tall without pressing your back unnaturally against the chair.

Crossing Your Legs

Crossing your legs may cause your hips and spine to rotate. It can also make it harder to keep your feet grounded. Place both feet on the floor when recording important vocal parts.

Sitting Too Far Back

A deep chair may encourage you to relax into a rounded position. Sit toward the front portion of the seat if that helps you keep your spine long and your chest comfortable.

Turning Toward the Screen

If your computer is positioned to one side, you may twist your neck while singing. Face the microphone first. Arrange your screen, keyboard, or remote controls so you can operate them without changing your vocal position.

Pressing the Abdomen

A tight waistband or cramped sitting position can make breathing uncomfortable. Wear clothing that allows your torso to move freely, especially during demanding songs.


A Simple Test to Choose Your Position

If you are deciding whether to sit or stand, try this quick recording test:

  1. Warm up your voice gently.
  2. Set the microphone and pop filter in a comfortable position.
  3. Record one verse and chorus while standing.
  4. Rest briefly.
  5. Record the same sections while sitting with good posture.
  6. Keep the microphone settings and room conditions the same.
  7. Listen to both takes at a similar volume.
  8. Compare comfort, tone, pitch, breath control, energy, and consistency.

Do not choose the louder take automatically. A louder vocal may simply be closer to the microphone or delivered with more force. Pay attention to which position gives you a balanced sound without unnecessary strain.

Also consider how your performance feels after several takes. A position that sounds good for one take may become tiring during a full session. The best recording posture should support both vocal quality and endurance.


When You Should Switch Positions

You do not have to use the same position for every part of a recording session. Some singers stand for lead vocals and sit for harmonies. Others stand for energetic songs and sit for spoken introductions or soft backing parts.

You may also switch positions when your body becomes tired. A short break, gentle stretch, or change in posture can help you reset your breathing and attention.

If you change from sitting to standing during the same song, make sure your microphone position remains consistent. You may need to adjust the stand or mark the floor so your mouth stays at the same height and distance.

You can also record difficult sections while standing and less demanding sections while sitting. This is perfectly acceptable as long as the tone and microphone technique remain controlled.


So, Is Standing or Sitting Better?

For most singers, standing is the best starting position when recording vocals. It usually provides more freedom for breathing, movement, projection, and emotional delivery.

But standing is not a requirement for a great vocal. Sitting can work just as well when you maintain an upright, relaxed posture and avoid compressing your body. Research has also found no significant vocal-range-profile advantage between sitting and standing in healthy, untrained participants, reinforcing the idea that posture quality matters more than the position by itself.

Choose standing when you need more energy, powerful projection, long phrases, or physical expression. Choose sitting when it helps you stay comfortable, focused, relaxed, or efficient during a long recording session.

The most accurate answer is simple: record in the position that gives you the best performance without tension. Keep your posture balanced, your breathing natural, and your distance from the microphone consistent. If you can do those things, both sitting and standing can produce an excellent vocal recording.

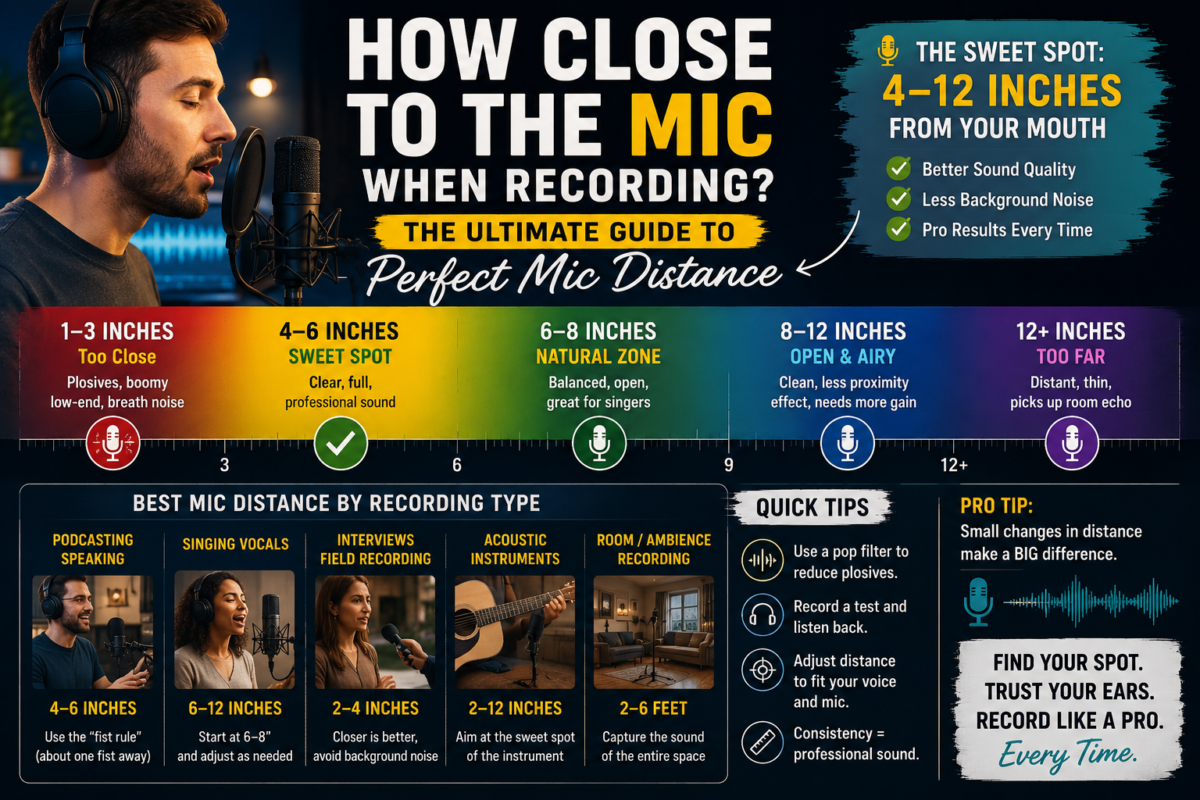
How Close to the Mic When Recording? The Ultimate Guide to Perfect Mic Distance

If you’ve ever recorded audio that sounded muddy, boomy, or too quiet, the problem might not be your microphone—it’s probably your distance from it. The secret to crystal-clear recordings is mastering how close to stand or position your mouth to the mic. For most speaking and vocal applications, the ideal microphone distance is between 4 to 12 inches from your mouth. This sweet spot captures your voice with clarity and presence while avoiding common audio issues like plosives (popping sounds from breath), excessive background noise, or a boomy tone.

Whether you’re recording podcasts, vocals for music, voiceovers, interviews, or YouTube videos, mic distance is one of the simplest things you can control to instantly upgrade your sound quality. You don’t need expensive gear or a professional studio—just the right placement technique. In this guide, we’ll break down exactly how close to be to the mic for different recording scenarios, why distance matters so much, and easy tricks to find your perfect spot every time.


Why Mic Distance Makes All the Difference

Your microphone doesn’t just hear your voice—it hears your voice + everything around it. The closer you are to the mic, the more of your voice it captures and the less of the room noise it picks up. This is called the “proximity effect.” When you’re close (around 4–6 inches), your voice sounds fuller, warmer, and more intimate. But if you’re too close (less than 3 inches), you’ll start hearing unwanted breath pops, plosives, and a overly boomy low-end that makes your recording sound unprofessional.

On the flip side, standing too far away (more than 12 inches) makes your voice sound thin, quiet, and distant. The mic also picks up more room echo, HVAC noise, keyboard clicks, and background chatter. Ever notice how professional podcasters sound so crisp and close while home recordings sound like they’re in an empty gym? That’s almost always about mic distance.

Here’s what happens at different distances:

Distance from MicSound QualityCommon Issues
1–3 inchesVery warm, intimate, loudPlosives (popping), boomy low-end, breath noise 
4–6 inchesClear, full, professionalMinimal issues—this is the sweet spot for most speakers 
6–8 inchesNatural, balanced, slightly less intimateGreat for singers who move around 
8–12 inchesOpen, airy, less room noiseVoice sounds slightly quieter, needs better preamp gain 
12+ inchesDistant, thin, lots of room echoPicks up background noise, sounds unprofessional 

The key takeaway? There’s no single “perfect” distance for everyone, but 4–8 inches is the golden range for 90% of recording situations. The rest is about tweaking based on your voice, your mic, and what you’re recording.


The Right Distance for Different Recording Types

Not all recordings need the same mic distance. Singers, podcasters, interviewers, and voiceover artists all have slightly different needs. Let’s break it down by scenario so you know exactly how close to be every time.

Podcasting and Speaking Applications

For podcasts, voiceovers, narration, and talking-head videos, the optimal microphone distance is 4 to 6 inches from your mouth. This distance gives you that “radio voice” sound—clear, confident, and intimate without sounding too close or boomy.

Many podcasters use the “fist rule”: hold your hand up in a fist and position the mic so it’s about one fist-length away from your mouth (roughly 4–6 inches). This is a super easy trick that works for almost anyone.

If you’re doing a podcast with multiple people sharing one mic, bump the distance out to 8–10 inches so everyone can be heard clearly without one person dominating the recording.

Singing Vocals (Pop, Rock, Rap, Country)

For singing vocals, the general rule of thumb is 6 to 12 inches away from the microphone. Why the wider range? Singers move more than speakers—they lean in for emotional parts, pull back for powerful notes, and sway with the rhythm. Starting at 6–8 inches gives you room to move without accidentally getting too close.

Different genres have different preferences:

  • Pop and R&B: 6–8 inches for that smooth, intimate sound
  • Rock and Metal: 8–10 inches to handle loud singing without distortion
  • Rap: 4–6 inches (sometimes even closer) for that tight, aggressive sound, but use a pop filter to avoid plosives
  • Country and Folk: 8–12 inches for a more natural, airy sound

If you’re new to recording vocals, grab a tape measure or ruler and actually measure 6 inches from your mouth to the mic. It sounds silly, but it helps you build the muscle memory for where to stand every time.

Interviews and Field Recording

When recording interviews (especially outdoor or on-the-go), the mic should be held about 3 inches from the person’s mouth for the clearest sound. This is closer than indoor recording because there’s usually more background noise outside.

Key tips for interviews:

  • Never let your interviewee hold the mic—they’ll fidget and create noise
  • Point the mic away from noisy backgrounds (traffic, crowds)
  • Use a boom arm or handheld mic on a stand so it stays in the perfect spot
  • Keep your hand planted on the mic stand and don’t move it during the recording

For video interviews where the mic needs to be hidden (like an on-camera mic), position it as close as possible without being in the frame—usually 6–10 inches works best.

Acoustic Instruments and Room Recording

Recording instruments is a whole different game. For acoustic guitar, start with the mic 6–12 inches away, pointed at the spot where the neck meets the body. For drums, overhead mics are usually 2–4 feet above, while snare mics are 1–2 inches above the rim.

If you’re recording a full band or room ambience, you’ll want to be much farther away—2–6 feet depending on the room size. The goal here is to capture the “space” of the room, not just the instrument.


Easy Tricks to Find Your Perfect Mic Distance Every Time

You don’t need a degree in audio engineering to nail mic distance. Here are four simple tricks that work for anyone:

1. The Fist Rule (Best for Podcasters)

Hold up your hand in a fist. The distance from your thumb to your knuckles is roughly 4–6 inches. Position the mic there. This is the most popular trick among podcasters because it’s fast, repeatable, and works for almost everyone.

2. The Two-Fist Rule (Best for Singers)

Stack two fists together. The distance from your thumb to the last knuckle is about 6–12 inches. This is perfect for singers who need room to move.

3. The Hand-Length Rule

Measure from the tip of your pinky to the tip of your thumb when your hand is open. That’s roughly 6–8 inches—perfect for most vocal recording.

4. The Tape Measure Method (Best for Beginners)

If you’re really new to recording, grab a tape measure or ruler and literally measure 6 inches from your mouth to the mic. Do this 3–5 times until you can feel where 6 inches is without measuring. Your brain will start to remember the spot.

Bonus Tip: Always Use a Pop Filter

If you’re recording within 4–6 inches of the mic (especially for rap or podcasting), use a pop filter between your mouth and the mic. This blocks plosives and breath noise while still giving you that warm, close sound.


Common Mic Distance Mistakes (And How to Fix Them)

Even experienced recordists make these mistakes. Here’s what to avoid:

Mistake 1: Standing Too Close
You’re less than 3 inches from the mic. Your recording sounds boomy, and you hear “popping” on words like “pop,” “potato,” and “baby.”

  • Fix: Move back to 4–6 inches and add a pop filter.

Mistake 2: Standing Too Far
You’re more than 12 inches from the mic. Your voice sounds thin, quiet, and distant. You hear lots of room echo.

  • Fix: Move closer to 6–8 inches. If your voice is still quiet, increase the gain on your recorder, not the distance.

Mistake 3: Moving Around Too Much
You lean in for emotional parts and pull back for loud parts, but your distance changes by 6+ inches. Your recording volume and tone fluctuate wildly.

  • Fix: Find your sweet spot (6 inches is great) and stay there. If you need more dynamics, use your voice, not your body distance.

Mistake 4: Not Angling the Mic
You’re pointing the mic directly at your mouth. This maximizes plosives.

  • Fix: Angle the mic slightly up or down (15–30 degrees) so breath goes past the mic instead of into it.

Mistake 5: Using the Wrong Mic for the Distance
You’re using a microphone that’s not designed for close recording (like some live sound mics) and trying to record 4 inches away.

  • Fix: Most cardioid condenser mics love 5–6 inches+ with a pop filter. Check your mic’s specs before recording.

Final Tips for Recording Like a Pro

Here are a few last tricks to take your recordings from “home studio” to “professional”:

  • Test before you record: Say a few sentences and listen back. If it sounds boomy, move back 1 inch. If it sounds thin, move closer 1 inch. Repeat until it’s perfect.
  • Use a boom arm: A boom arm keeps the mic steady at the exact distance you set. No more accidentally moving it 3 inches closer while you’re singing.
  • Record in a quiet room: Even at the perfect distance, a noisy room will ruin your recording. Turn off fans, close windows, and record when it’s quiet.
  • Don’t fidget: Plant your hand on the mic stand and don’t move it during recording. Every movement changes your distance and ruins consistency.
  • Experiment: Your voice is unique. Someone else’s perfect 6 inches might be 7 inches for you. Try 4, 5, 6, 7, and 8 inches and pick the one that sounds best to YOU.

Your New Go-To Mic Distance

So, how close to the mic when recording? The answer is simple: 4 to 8 inches is your golden zone for most speaking and vocal recordings. Start at 6 inches, test it, and tweak by 1-inch increments until your voice sounds crystal clear, warm, and professional.

Remember:

  • Podcasts and speech: 4–6 inches
  • Singing vocals: 6–12 inches
  • Interviews: 3 inches (outdoor) to 6 inches (indoor)
  • Always use a pop filter if you’re under 6 inches

Mic distance is the easiest free upgrade you can give your audio. No expensive gear, no fancy plugins—just move your mic (or your mouth) a few inches and instantly sound better. Now grab your mic, measure 6 inches, and record something that sounds amazing. You’ve got this!

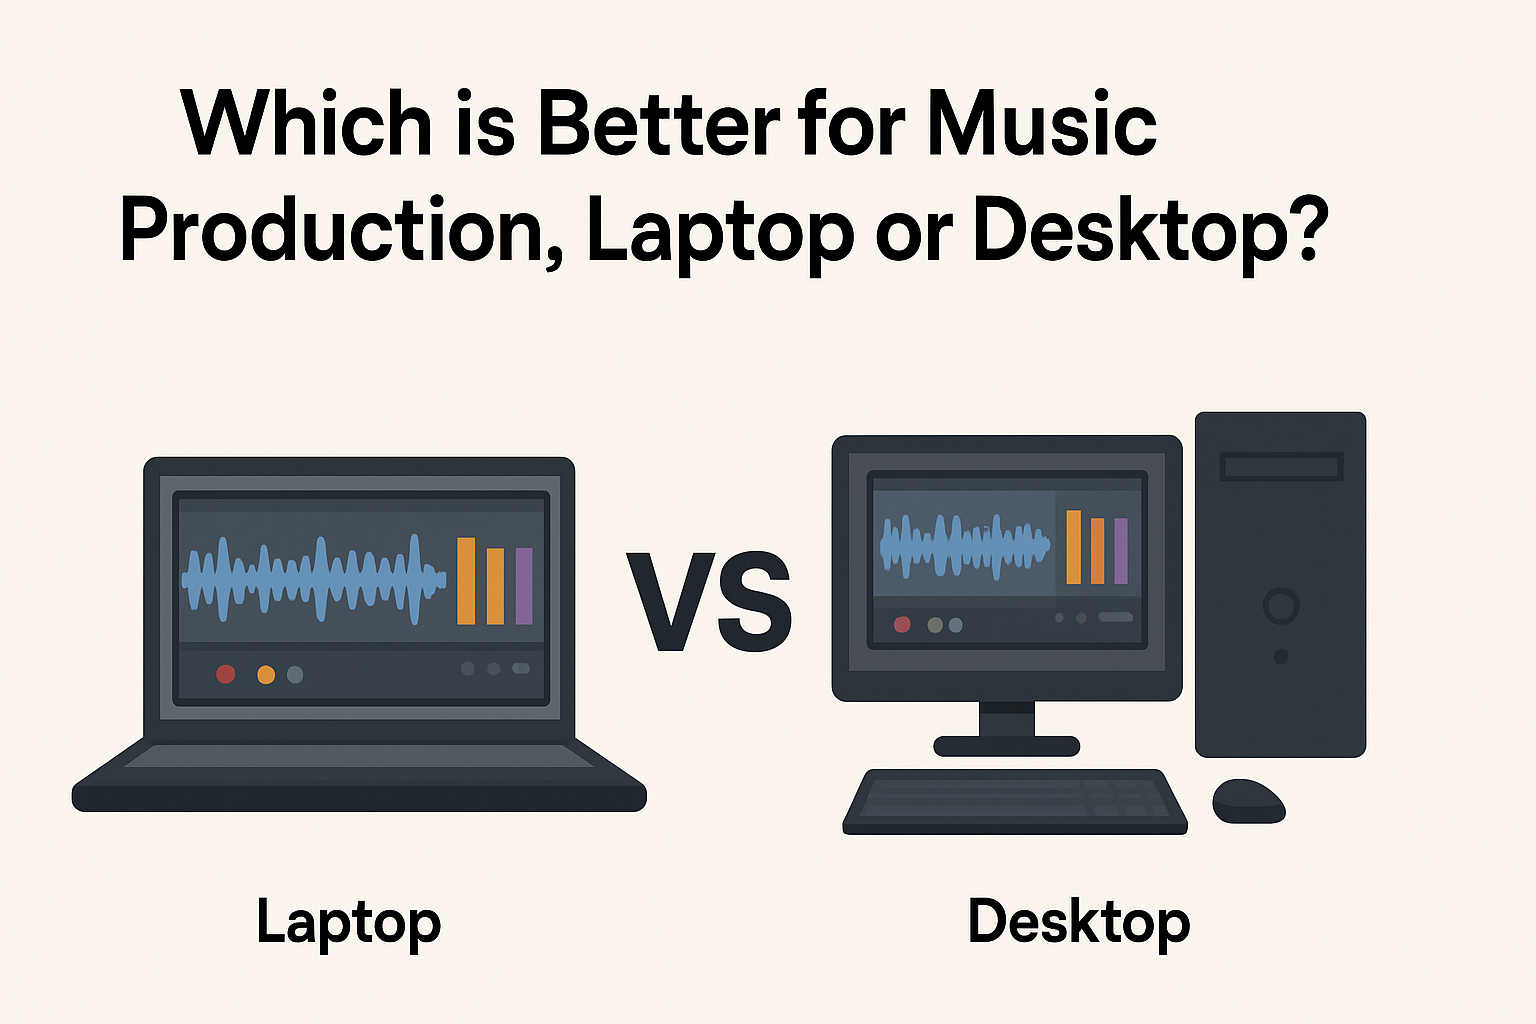
Which is Better for Music Production, Laptop or Desktop?

When deciding between a laptop and desktop for music production, you want to choose the option that fits your workflow, budget, and space. Both have their strengths and weaknesses, so understanding what matters most to you will help you make the right choice. Let’s break down the factors you should consider so you can answer the question: which is better for music production?


Performance and Power: How Much Muscle Do You Really Need?

Music production software, also called digital audio workstations (DAWs), can be demanding. They require good processors, plenty of RAM, and fast storage to handle multiple tracks, plugins, and effects smoothly. Desktop computers generally offer better performance because they can accommodate bigger, faster components.

With a desktop, you’re able to choose powerful processors, high amounts of RAM (16GB or more), and large solid-state drives (SSD) without worrying much about power consumption or heat. This means fewer slowdowns and less waiting time when you’re mixing or rendering your tracks.

Laptops, while improving rapidly, often have to make compromises. They may have slower processors and less RAM than desktops at the same price point. Over long sessions, laptops can heat up, causing performance dips due to thermal throttling. However, modern high-end laptops can still provide plenty of power for music production, especially if you mainly use a moderate number of tracks and effects.

If you heavily multitask with extensive plugins, virtual instruments, and large sample libraries, a desktop might serve you best. But if you produce more straightforward projects or focus on portability, a laptop can handle most workloads just fine.


Portability: Work Anywhere You Want or Stay Set Up at Home

One of the biggest differences between laptops and desktops is portability. If you want to produce music on the go, a laptop is obviously the way to go. You can work at a coffee shop, travel while still having your setup, or collaborate easily with others by bringing your machine along.

Desktops, on the other hand, are designed for a fixed location. This means more setup freedom — you can use bigger monitors, full-sized keyboards, professional audio interfaces, and studio-grade speakers without worrying about space or battery life. But moving a desktop rig often means disconnecting multiple cables and packing heavy components, making it impractical for mobile work.

So, if your music production requires frequent location changes or live performances, a powerful laptop gives you the flexibility to keep creating wherever inspiration hits.

If you mostly produce at home or in a studio space, a desktop gives you more room to build your dream setup without portability constraints.


Upgradeability and Cost: Plan Now, Grow Later

Desktops usually win in upgradeability. You can swap out your CPU, add more RAM, upgrade your storage, or even improve your audio interface with ease. This means a desktop can last longer and keep up with new software requirements without needing a full replacement.

Laptops have limited upgrade potential. You’re often restricted to upgrading only the RAM or storage, and sometimes even those are soldered onto the motherboard. When your laptop becomes outdated, you usually have to buy a new one.

Cost-wise, desktops tend to offer more performance for your money. Because you can build or choose parts separately, you often get better specs at a lower price compared to laptops.

But laptops bundle portability and power in a compact device, which can be worth the extra cost if mobility is important to you.


Choose What Fits Your Music Production Style

  • If you want maximum power, easier upgrades, and don’t mind a fixed workspace, go with a desktop.
  • If you need to produce music on the move or have limited space, a laptop is your best bet.

Both devices can handle music production well today, but knowing your needs will guide your choice.

Remember to also invest in good headphones, audio interfaces, and speakers to improve your sound quality no matter which machine you choose.

Your music production journey is personal — pick the tool that helps you create without limits!

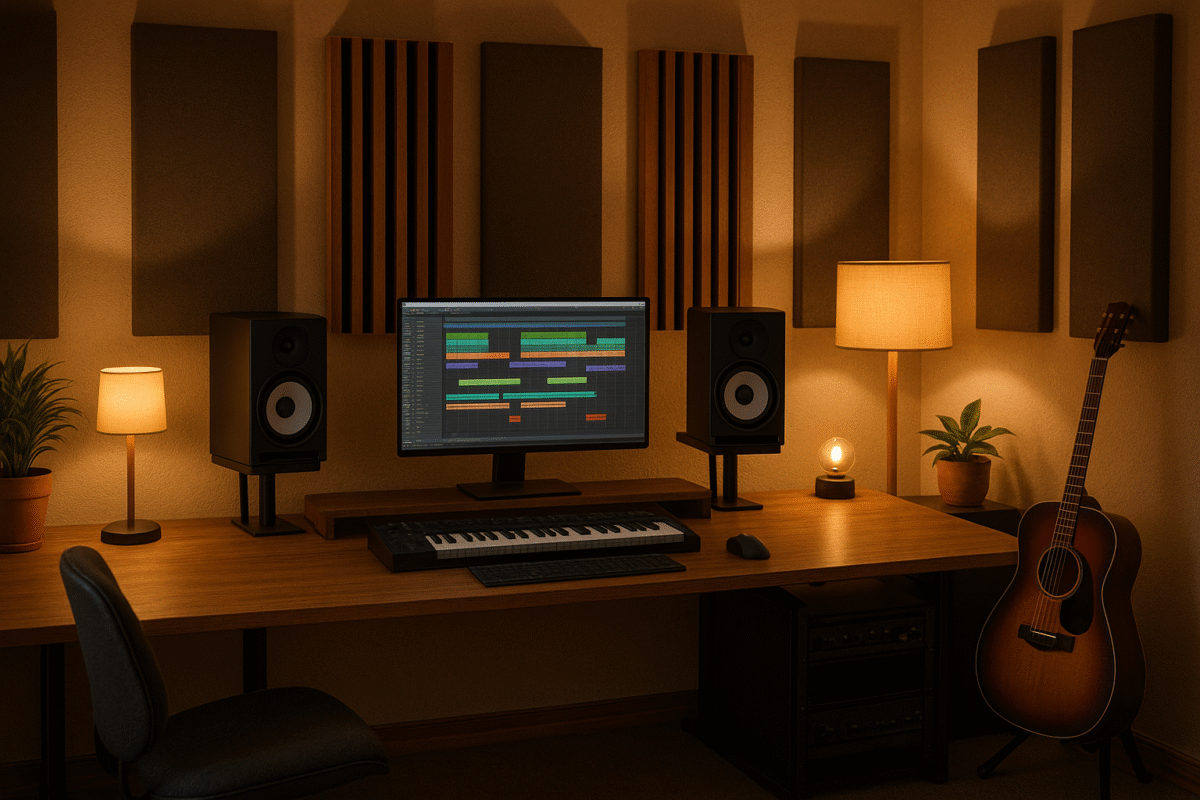
How Can I Improve the Sound of My Home Studio?

Creating a home studio that sounds professional is more achievable than ever, but it takes more than just buying gear. You need to focus on your room’s acoustics, the layout of your equipment, and the quality of your recording chain. Let’s break down the most effective ways you can transform your home studio into a space where your creativity shines and your mixes sound great everywhere.

Optimize Your Room’s Acoustics

Treat the Room First, Not Last

You might think your gear is the most important part of your studio, but the room itself has a huge impact on your sound. Even the best microphones and monitors can’t fix a room that’s full of echoes, boomy bass, or weird reflections. Start by treating your room with a mix of absorption and diffusion.

  • Acoustic Panels: Place large acoustic panels on your walls to absorb mid and high frequencies. This reduces echoes and makes your mixes clearer and more accurate.
  • Bass Traps: Bass frequencies build up in the corners of your room, making mixes sound muddy. Install thick bass traps in all corners to absorb these low frequencies and tighten up your sound.
  • Diffusers: Once you’ve controlled the reflections and bass, add diffusers to the rear wall. Diffusers scatter sound waves, preventing harsh echoes and creating a more natural, lively sound in your studio.
  • Rugs and Curtains: Hard floors reflect sound, so lay down a thick rug to reduce unwanted reflections. Use curtains over windows to control brightness or deaden the room as needed.

Smart Speaker and Listening Position

Where you put your monitors and where you sit can make or break your mixes.

  • Monitor Placement: Place your studio monitors so they form an equilateral triangle with your head. Your ears should be at the same height as the tweeters. This setup puts you in the “sweet spot” for balanced stereo imaging.
  • Room Symmetry: Keep your setup as symmetrical as possible. Uneven room shapes or furniture placement can cause reflections that skew your perception of the mix.
  • Distance from Walls: Don’t place your monitors right up against the wall. Leave some space (at least a few inches) to avoid bass build-up and reflections that can color your sound.

Analyze and Adjust

Use free room analysis software like REW to identify problem frequencies and pressure zones in your room. This helps you place your acoustic treatment and monitors more effectively, and ensures you’re hearing an accurate representation of your music.

Build a Clean Recording Chain

Invest in Quality Where It Counts

A great-sounding studio starts with a clean signal path from your microphone to your computer.

  • Microphone and Preamp: A decent microphone and preamp can make a huge difference. Even if you’re on a budget, choose a mic known for clarity and a preamp that adds minimal noise.
  • Audio Interface: Your audio interface converts analog signals to digital. Look for one with clean preamps and reliable drivers. This ensures your recordings are clear and free from distortion.
  • Cables and Power: Use quality cables to avoid unwanted noise. Power your gear from a clean source and avoid running audio cables parallel to power cables to minimize interference.

Monitor With Confidence

  • Studio Monitors: Invest in accurate studio monitors rather than regular speakers. Monitors are designed for critical listening and will reveal problems in your mix you might miss otherwise.
  • Headphones: Closed-back headphones are great for tracking vocals or instruments without bleed. Open-back headphones can be used for mixing, but always check your mixes on monitors as well.

Room Correction Tools

Some monitors come with built-in room correction, or you can use software solutions like Sonarworks or IK Multimedia’s ARC System. These tools analyze your room and adjust your monitor output to compensate for acoustic problems, helping your mixes translate better to other listening environments.

Control the Noise: Soundproofing and Isolation

Keep Unwanted Noise Out (and In)

Soundproofing is different from acoustic treatment. While treatment improves sound quality inside the room, soundproofing keeps outside noise from getting in and your music from leaking out.

  • Doors and Windows: Use solid-core doors and seal any gaps with weatherstripping. Heavy curtains over windows help block outside noise.
  • Walls and Ceilings: For serious soundproofing, consider adding mass-loaded vinyl behind drywall, or use sound isolation clips and double layers of drywall. Seal all gaps with acoustic caulk to prevent sound leaks.
  • Floors: If you’re in an apartment or upstairs room, add thick carpets or rugs to reduce sound transmission through the floor.

Isolate Your Gear

Vibrations from stands or desks can travel into your microphones or monitors, coloring your sound.

  • Monitor Isolation Pads: Place your monitors on foam pads or dedicated isolation stands to prevent vibrations from reaching your desk or stands.
  • Shock Mounts: Use shock mounts for microphones to reduce vibrations from footsteps or bumps.

Fine-Tune Your Workflow and Layout

Ergonomics and Inspiration

A well-organized studio helps you work faster and stay inspired.

  • Cable Management: Keep cables tidy and out of the way to avoid tripping hazards and accidental disconnections.
  • Lighting: Use soft, adjustable lighting to create a comfortable atmosphere. Avoid harsh overhead lights that can cause eye strain.
  • Furniture: Choose a comfortable chair and a desk that fits your gear. Keep your most-used equipment within easy reach.

Experiment and Listen

No two rooms are the same. Move your monitors, desk, or acoustic panels around and listen to the difference. Sometimes moving your listening position just a few inches can improve your sound dramatically.

Mix at Lower Volumes

Mixing at lower volumes helps prevent ear fatigue and lets you hear a more accurate balance of frequencies. If your mix sounds good at a low volume, it will usually sound great when played loud.

Upgrade Thoughtfully

Don’t Chase Gear—Chase Results

It’s tempting to buy new gear, but focus on improving your room and workflow first. Once you’ve treated your room and optimized your setup, then consider upgrading your microphone, interface, or monitors for even better results.

Keep Learning

The best producers are always learning. Watch tutorials, read articles, and experiment with new techniques. Your ears will improve over time, and so will your mixes.

Improving the sound of your home studio is a journey, not a single step. By treating your room, optimizing your setup, investing in a clean recording chain, and controlling noise, you’ll create a space where your music can truly shine. Every small improvement adds up, so keep tweaking, listening, and enjoying the process. Your future self—and your listeners—will thank you.

How to Fix Poor Sound Quality Recording: A Comprehensive Guide

When it comes to audio production, one of the most frustrating problems creators face is poor sound quality. Whether you’re a podcaster, musician, voiceover artist, or video creator, high-quality audio can make or break your project. If you’re struggling with recordings that sound muffled, distorted, or have background noise, don’t worry—there are practical steps you can take to enhance your audio quality. Here’s how to fix poor sound quality recording effectively.

Identify Common Sound Quality Issues

Before diving into the solutions, it’s essential to pinpoint what’s wrong with your recording. Common sound quality issues include:

  • Background noise: Unwanted sounds like fans, traffic, or echoes.
  • Distortion: Overmodulation causing harsh, grating audio.
  • Muffled sound: Audio that lacks clarity and sounds like it’s covered.
  • Low volume levels: Recordings that are too quiet.
  • Hiss and hum: Persistent background noise, often due to poor electrical grounding.

By identifying the specific problem, you can tailor your approach to achieve the best results.

Optimize Your Recording Environment

Your recording environment plays a pivotal role in the quality of your audio. Here’s how to make improvements:

  • Soundproof the space: Use acoustic panels, foam, or even blankets to dampen echo and absorb sound reflections.
  • Minimize background noise: Turn off fans, air conditioners, and other electronic devices that can contribute to noise.
  • Choose a quiet location: Record away from windows or in a secluded room to avoid outside noise pollution.

Use the Right Equipment

Investing in reliable audio equipment can drastically improve your recording quality.

a.) Microphones:

  • Dynamic microphones are great for environments with more background noise.
  • Condenser microphones capture richer sound but are more sensitive to surroundings.

b.) Audio interfaces: Ensure you use a good-quality interface to connect your microphone to your computer, which can prevent audio degradation.
c.) Headphones: Use closed-back headphones to monitor sound without leakage.

Tip: A pop filter can help reduce plosive sounds, such as “p” and “b,” which can distort audio.

Set Proper Recording Levels

Incorrect recording levels are a common cause of poor sound quality. Here’s how to set your levels for the best outcome:

  • Maintain a safe recording level: Aim for peaks at around -6dB. This provides a buffer to avoid clipping and distortion.
  • Avoid clipping: This occurs when input levels are too high and causes distortion. Adjust the input gain on your interface or recording device as needed.
  • Monitor with headphones: This helps you hear any issues in real-time.

Use Proper Microphone Techniques

Microphone placement and technique can have a significant impact on sound quality.

  • Maintain consistent distance: Keep a consistent distance of 6–12 inches from the microphone to ensure stable volume and tone.
  • Avoid excessive movement: Moving around too much can result in uneven sound.
  • Angle the microphone: Positioning the microphone slightly off-center can reduce the chances of plosive sounds directly impacting the mic diaphragm.

Post-Production Fixes

Even with the best preparation, recordings might still need editing to reach a professional standard. Here’s how to enhance your audio using software:

a.) Noise reduction:

  • Use software like Audacity, Adobe Audition, or iZotope RX to remove background noise.
  • Most digital audio workstations (DAWs) come with noise gate plugins to suppress unwanted noise below a certain threshold.

b.) Equalization (EQ):

  • Adjust the EQ settings to brighten or deepen the sound. Reducing the low frequencies (e.g., 80Hz and below) can help clear up muddiness.
  • Boost higher frequencies (e.g., 3kHz–8kHz) to add clarity.

c.) Compression:

Apply compression to even out volume discrepancies within the recording. This ensures that the quieter parts are audible without the louder parts overpowering them.

d.) Reverb control:

Too much reverb can make audio sound distant and unclear. Apply subtle reverb if needed or reduce it with plugins to keep the sound clean.

Tip: Always listen to your edits on different devices (e.g., headphones, speakers, smartphones) to ensure consistent quality.

Advanced Techniques for Superior Sound

For those seeking further refinement, advanced tools and techniques can be used:

  • De-essing: This technique helps reduce harsh “s” sounds that can be distracting.
  • Multi-band compression: Control specific frequency ranges separately for more detailed dynamic adjustments.
  • Audio restoration plugins: Tools like iZotope RX can repair clicks, pops, and other imperfections in recordings.

Best Practices for Future Recordings

To maintain a high standard of audio quality moving forward, follow these practices:

  • Routine equipment checks: Inspect your equipment regularly for wear or malfunction.
  • Update software: Ensure your DAW and plugins are up-to-date for optimal performance.
  • Practice good recording habits: Spend a few minutes testing levels and experimenting with mic placement before starting the actual recording.

FAQs About Fixing Poor Sound Quality Recording

How can I eliminate background noise without affecting audio quality?

Use a noise reduction tool sparingly and apply it in multiple light passes rather than one aggressive application to preserve sound quality.

What’s the best DAW for audio editing?

Popular options include Audacity (free), Adobe Audition, and Reaper, each offering robust features for audio enhancement.

How do I prevent clipping during recording?

Monitor your input levels closely and ensure they peak around -6dB. Adjust the gain accordingly and test before recording.

Can I fix distorted audio?

While it’s hard to completely fix distorted audio, software like iZotope RX has tools to help reduce some of the harshness.

Why do my recordings sound muffled?

Check your microphone placement and room acoustics. Muffled sound can often be due to poor positioning or reflections in the recording environment.

What’s the best way to avoid hiss and hum?

Ensure proper grounding of your audio equipment and check your cables for wear. Applying a noise gate can also help minimize persistent hiss.


Achieving high-quality audio requires both preparation and technical knowledge. By optimizing your environment, choosing the right equipment, employing correct techniques, and mastering post-production tools, you can transform poor sound quality into a polished, professional result. Keep refining your process, and you’ll find that great sound is within your reach.

What gives the best audio quality?

When it comes to achieving the best audio quality, several factors play significant roles, from the type of audio equipment used to the file formats and environmental considerations. This guide aims to demystify these aspects, helping you understand what influences sound quality and how to optimize it for your needs.


The Basics of Audio Quality

Audio quality refers to the accuracy and clarity of sound that audio equipment produces. It encompasses various attributes such as frequency response, dynamic range, and signal-to-noise ratio. The ultimate goal is to reproduce sound as faithfully as possible to its original recording.


Key Components Influencing Audio Quality

A. Audio Source and Format

The quality of an audio file directly impacts what you hear. Here’s a look at different audio formats:

  • Lossless Formats: These include FLAC, ALAC, and WAV. They preserve the audio data without compression, offering superior sound quality. For audiophiles, lossless formats are the go-to for ensuring minimal loss of detail.
  • Lossy Formats: MP3 and AAC are popular due to smaller file sizes. However, they achieve this by compressing audio and sacrificing some sound fidelity.

Recommendation: For the best audio quality, opt for lossless formats whenever possible, especially for critical listening.

B. Audio Equipment

High-quality audio equipment is essential for superior sound reproduction. Here’s what to consider:

  • Headphones and Earphones: Over-ear headphones generally provide better sound quality than earbuds due to their larger drivers and better sound isolation. Brands like Sennheiser, Bose, and Sony are known for their high-end models that offer crystal-clear sound.
  • Speakers: For home audio systems, floor-standing speakers and studio monitors offer a fuller range of sound compared to compact speakers.
  • DACs (Digital-to-Analog Converters): These devices convert digital audio into analog signals, impacting audio quality. High-quality DACs help maintain the integrity of the original sound.

Tip: Pairing a high-quality DAC with excellent headphones or speakers can dramatically enhance your listening experience.


Acoustic Environment: The Hidden Player

The environment in which you listen to audio can drastically affect sound quality. Room acoustics, including the size, materials, and layout, determine how sound waves behave.

  • Acoustic Treatment: Using foam panels, bass traps, and diffusers can mitigate issues like echo and reverb, creating a more controlled listening space.
  • Positioning: The placement of speakers and the listener’s location relative to them influence sound clarity. A symmetrical setup in a room can prevent imbalances in the audio output.

Bitrate and Sample Rate: How They Matter

  • Bitrate: Measured in kilobits per second (kbps), bitrate indicates the amount of data processed per second of audio. Higher bitrates (e.g., 320 kbps for MP3s) yield better sound quality.
  • Sample Rate: Measured in Hertz (Hz), this defines how many times per second audio is sampled. CDs typically use 44.1 kHz, but higher sample rates (48 kHz or 96 kHz) can provide more detailed sound reproduction.

Balancing Audio Quality and Storage

Lossless audio formats are more storage-intensive than lossy ones. However, as technology evolves and storage becomes cheaper, choosing higher-quality files is increasingly practical. Streaming services like Tidal and Amazon Music HD cater to audiophiles by offering high-resolution streams.


Connectivity: Wired vs. Wireless

  • Wired Connections: These provide the most stable and interference-free audio transmission. Using high-quality cables ensures minimal signal degradation.
  • Wireless Connections: Bluetooth audio has improved with codecs such as aptX HD and LDAC, which support higher bitrates for better sound quality. However, true audiophiles often prefer wired setups for the best results.

Audio Amplifiers and Their Role

An amplifier boosts the signal sent to your headphones or speakers. High-end audio setups often benefit from dedicated amplifiers that can drive speakers or headphones with higher impedance, ensuring full dynamic range and clarity.


Popular Myths About Audio Quality

  • “Higher Volume Equals Better Quality”: This is a common misconception. Playing audio too loudly can distort sound and damage your hearing over time.
  • “All Lossless Formats Are the Same”: While formats like FLAC and WAV are both lossless, FLAC is compressed to save space, while WAV files are not. The difference in audio quality, however, is typically negligible to the human ear.

Real-World Tips for Enhancing Audio Quality

  • Upgrade Your Cables: High-quality gold-plated audio cables can reduce signal loss and improve sound clarity.
  • Keep Software Updated: Ensure your audio drivers and playback software are up to date for optimal performance.
  • Avoid Overprocessing: Using too many EQ adjustments can degrade audio quality. Aim for minimal processing to preserve the original sound.

Choosing the Right Setup for Your Needs

Consider the following setups based on listening preferences:

  • Casual Listeners: A pair of reliable mid-range headphones (e.g., Audio-Technica or JBL) and streaming from a high-quality service.
  • Audiophiles: High-resolution digital audio files, a dedicated DAC, and top-tier headphones or studio monitors.
  • Home Theater Enthusiasts: A surround sound speaker system paired with a high-definition receiver for immersive audio.

FAQs About Audio Quality

Does high-resolution audio make a noticeable difference?

For most listeners, the difference may not be significant, but audiophiles with trained ears and high-end equipment can detect improved detail and depth in high-resolution audio.

Are noise-canceling headphones good for audio quality?

Yes, especially for environments with background noise. However, some audiophiles prefer headphones without active noise cancelation to avoid potential distortion.

Is there a point where bitrate improvements stop making a difference?

Yes, beyond 320 kbps, most listeners find it difficult to perceive a notable improvement, as diminishing returns set in.

Can wireless earbuds offer the best audio quality?

Modern wireless earbuds with advanced codecs can come close, but they still generally fall short of high-end wired solutions.

Do I need an amplifier for headphones?

It depends on your headphones’ impedance. High-impedance models benefit from an amplifier to reach their full potential.

How can I improve my car’s audio quality?

Upgrading the car speakers, adding a subwoofer, and using high-quality audio files can enhance the listening experience.


Achieving the best audio quality involves a combination of the right equipment, proper settings, and optimal file formats. Whether you are an audiophile or a casual listener, understanding these elements can elevate your sound experience to new heights.

What Are the 3 Things That Affect Audio Quality?

Audio quality is essential whether you’re listening to music, watching a movie, or working on a professional recording. Understanding what influences audio quality can make a significant difference in how sound is experienced. In this comprehensive guide, we explore the three primary factors that affect audio quality.


Bitrate

What is Bitrate?

Bitrate refers to the number of bits processed per unit of time in audio playback. It is measured in kilobits per second (kbps) and determines the amount of data used to represent the audio. The higher the bitrate, the more data is transmitted, resulting in better sound quality.

How Does Bitrate Affect Audio Quality?

  • Higher Bitrate: Produces clearer, more detailed audio by allowing a broader range of sound frequencies and dynamic ranges to be accurately reproduced. Examples include lossless formats like FLAC (Free Lossless Audio Codec) or WAV (Waveform Audio File).
  • Lower Bitrate: Can result in compressed audio where certain sound details are lost, leading to noticeable artifacts like “warbling” or diminished clarity. Common formats include MP3s at lower bitrates (128 kbps or lower).

Practical Examples of Bitrate in Use

  • Streaming Services: Many platforms, such as Spotify and Apple Music, offer different audio quality settings (e.g., 128 kbps, 256 kbps, 320 kbps). Choosing higher settings enhances the listening experience.
  • Recording Standards: In professional environments, lossless formats with high bitrates are preferred to ensure the integrity of the sound.

Tips for Optimal Bitrate

  • Know Your Purpose: Use a higher bitrate for professional recordings and personal music libraries. Lower bitrates may suffice for casual streaming to save bandwidth.
  • Choose the Right Format: For audiophiles, FLAC and WAV are superior due to their uncompressed nature, while MP3s provide convenience and smaller file sizes.

Equipment

Importance of Quality Equipment

The tools you use to produce or listen to audio play a crucial role in its final quality. These include playback devices, speakers, headphones, and recording gear. High-quality equipment captures and reproduces sound more accurately.

Critical Equipment that Influences Audio Quality

  • Microphones: Condenser microphones are often preferred in studios for their sensitivity and accurate sound reproduction. Dynamic microphones work better in live settings for their durability and resistance to background noise.
  • Headphones and Speakers: High-end headphones and speakers with a broad frequency range can produce more precise and fuller sound.
  • Amplifiers: For serious audiophiles, amplifiers help drive speakers or headphones, ensuring clean power delivery and better sound reproduction.

Common Pitfalls with Equipment

  • Inferior Components: Using low-quality headphones or speakers may lead to distortion, poor sound clarity, and limited frequency response.
  • Mismatched Equipment: Pairing a high-quality sound source with low-end speakers can bottleneck the experience. Ensuring compatibility among devices is crucial for preserving audio integrity.

Recommendations for Best Equipment

  • Entry-Level: For newcomers, investing in quality earbuds like the Audio-Technica ATH-M50x provides a good balance of cost and performance.
  • Professional: Studio monitors like the Yamaha HS8 or headphones such as the Sennheiser HD 650 offer exceptional sound accuracy.

Environment

How the Environment Impacts Audio Quality
The space in which audio is produced or listened to can significantly influence sound quality. Factors like room size, acoustic treatment, and noise levels contribute to the listening experience.

Acoustic Treatment Explained

  • Soundproofing: Prevents outside noise from entering the space and affecting the audio.
  • Acoustic Panels: Help absorb sound waves, reducing echo and reverb, leading to a cleaner, more controlled sound.
  • Bass Traps: Designed to manage low-frequency sounds that can overwhelm and distort the audio experience.

How to Improve Your Audio Environment

  • Home Listening: Position speakers at ear level and at an equilateral triangle setup for better sound distribution.
  • Recording Studios: Use a combination of foam panels, bass traps, and diffusers to create an acoustically balanced space.
  • Portable Solutions: For those on the go, noise-cancelling headphones can mitigate environmental sounds, enhancing the audio experience in non-ideal settings.

Practical Adjustments

  • Reducing Background Noise: Close windows, use rugs or carpets, and choose quieter times for critical listening.
  • Speaker Placement: Keep speakers at least a few inches from walls to reduce reflections and bass distortion.

Frequently Asked Questions (FAQs)

What is the best bitrate for high-quality audio?

The best bitrate for high-quality audio is typically 320 kbps for compressed formats like MP3. For lossless formats, bitrates upwards of 1,411 kbps (CD quality) are ideal.

Do expensive headphones really make a difference?

Yes, high-quality headphones often provide better sound accuracy, wider frequency response, and less distortion compared to cheaper models.

How does room size affect audio quality?

Room size affects how sound waves travel and reflect. Smaller rooms may produce more immediate reflections, while larger spaces can cause echoes. Proper acoustic treatment can mitigate these issues.

What’s the difference between soundproofing and acoustic treatment?

Soundproofing prevents external noise from entering a room, while acoustic treatment manages sound reflections within the space to improve audio clarity.

Why do some recordings sound different on different equipment?

Equipment varies in how it reproduces sound. Cheaper gear may not accurately present all audio frequencies, leading to differences in perceived audio quality.

Can software enhance audio quality?

Yes, software like equalizers and digital audio workstations (DAWs) can adjust and enhance sound. However, these tweaks can only go so far without good source material and equipment.


Achieving superior audio quality boils down to managing three main elements: bitrate, equipment, and environment. A high bitrate ensures rich detail in audio files, while top-tier equipment reproduces sound accurately. Meanwhile, optimizing your environment prevents audio distortion and external noise interference. By focusing on these factors, listeners can elevate their audio experience significantly.

How do I get the best sound quality when recording?

Getting the best sound quality when recording is essential for anyone looking to produce high-quality audio, whether it’s for podcasts, music, or videos. You want your recordings to sound crisp, clear, and professional. This guide will walk you through the steps to achieve that perfect sound quality. So, grab your microphone and let’s dive into the world of audio recording!

Understanding Sound Quality

Before we jump into the practical tips, let’s talk about what sound quality really means. Sound quality refers to how well audio is captured and reproduced. It encompasses clarity, richness, and the absence of unwanted noise. When you aim for the best sound quality when recording, you’re essentially trying to ensure that every note, word, and nuance is captured as authentically as possible.

The Importance of Environment

One of the first steps in achieving great sound quality is to consider your recording environment. The space where you record can significantly impact the audio quality.

  • Choose a Quiet Space: Look for a location free from background noise. Close windows, turn off noisy appliances, and avoid busy areas if possible.
  • Soundproofing: If you can, invest in some soundproofing materials like foam panels or heavy curtains. These can help absorb echoes and prevent outside noise from seeping in.
  • Room Acoustics: Rooms with soft furnishings tend to absorb sound better than bare walls. Carpets and curtains can help reduce reverb and create a more controlled acoustic environment.

Selecting the Right Equipment

Now that your environment is set up, let’s move on to equipment. The right tools can make a world of difference in your recordings.

  • Microphone Matters: Your microphone is crucial for capturing audio accurately. Invest in a high-quality microphone that suits your needs. For detailed recordings, condenser mics are excellent as they capture a wider frequency range.
  • Headphones: Use closed-back headphones while recording to minimize sound leakage and prevent mic bleed. This ensures that what you hear is what you record.
  • Audio Interface: An audio interface converts your microphone’s analog signal into digital data for your computer. Choose one with good preamps for clearer recordings.

Recording Software Setup

Once your equipment is ready, it’s time to set up your recording software. This is where the magic happens!

  • Choose Your Software: There are many options available like Adobe Audition, Pro Tools, or free ones like Audacity. Pick one that fits your skill level and budget.
  • Optimize Settings: Make sure to configure your software settings correctly. Match the sample rate and bit depth of your audio interface for optimal performance. A common setting is 24-bit/48kHz for high-quality recordings.
  • Recording Formats: Record in uncompressed formats like WAV or FLAC instead of MP3. These formats retain more audio detail and provide better overall sound quality.

Techniques for Better Sound Quality

With your environment set and equipment ready, let’s explore some techniques to enhance your sound quality further.

Microphone Placement

The placement of your microphone can drastically affect how well it captures sound.

  • Proximity Effect: Getting closer to the microphone can enhance the richness of your voice or instrument but be careful not to get too close as this can cause distortion.
  • Angle Matters: Experiment with angles; sometimes tilting the mic slightly away from the source can help reduce plosives (the popping sounds from letters like “p” and “b”) while still capturing clear audio.

Monitoring Levels

Keeping an eye on your audio levels during recording is vital.

  • Watch for Peaking: Ensure that your levels do not exceed -6dB to -3dB on your software meter to avoid distortion.
  • Use Headphones: Always monitor your recording through headphones to catch any issues in real-time—this way, you can adjust as needed before it’s too late.

Recording Techniques

Here are some additional tips to keep in mind while recording:

  • Record Filler Audio: Capture some ambient noise before starting your main recording session. This filler audio can be useful for smoothing out edits later on if you need to replace any sections.
  • Test Runs: Always do a test run before recording important material. Speak into the microphone and listen back carefully; this helps identify any issues with placement or background noise.

Post-Production Tips

After you’ve recorded your audio, post-production plays a crucial role in achieving that polished final product.

Editing Your Audio

Editing allows you to refine your recordings further.

  • Noise Reduction: Use noise reduction tools in your software to eliminate any unwanted background sounds that may have crept in during recording.
  • Equalization (EQ): Adjusting EQ settings can help enhance certain frequencies while cutting others that may muddy the sound. For example, boosting mid-range frequencies often helps vocals stand out more clearly.

Exporting Your Final Product

When you’re ready to export:

  • Choose High-Fidelity Formats: Exporting in WAV or FLAC ensures that you maintain high sound quality throughout distribution. If file size is a concern later on, you can always convert these files into compressed formats like MP3 after editing.

You can learn more on how to better record an audio on this video.

Achieving the best sound quality when recording involves careful consideration of various factors including environment, equipment selection, technique, and post-production editing. By following these tips—creating a quiet space, using high-quality microphones, optimizing software settings, monitoring levels closely, and refining during editing—you’ll be well on your way to producing professional-sounding audio. Remember, practice makes perfect! Don’t hesitate to experiment with different setups until you find what works best for you. Happy recording!